

Table of Contents
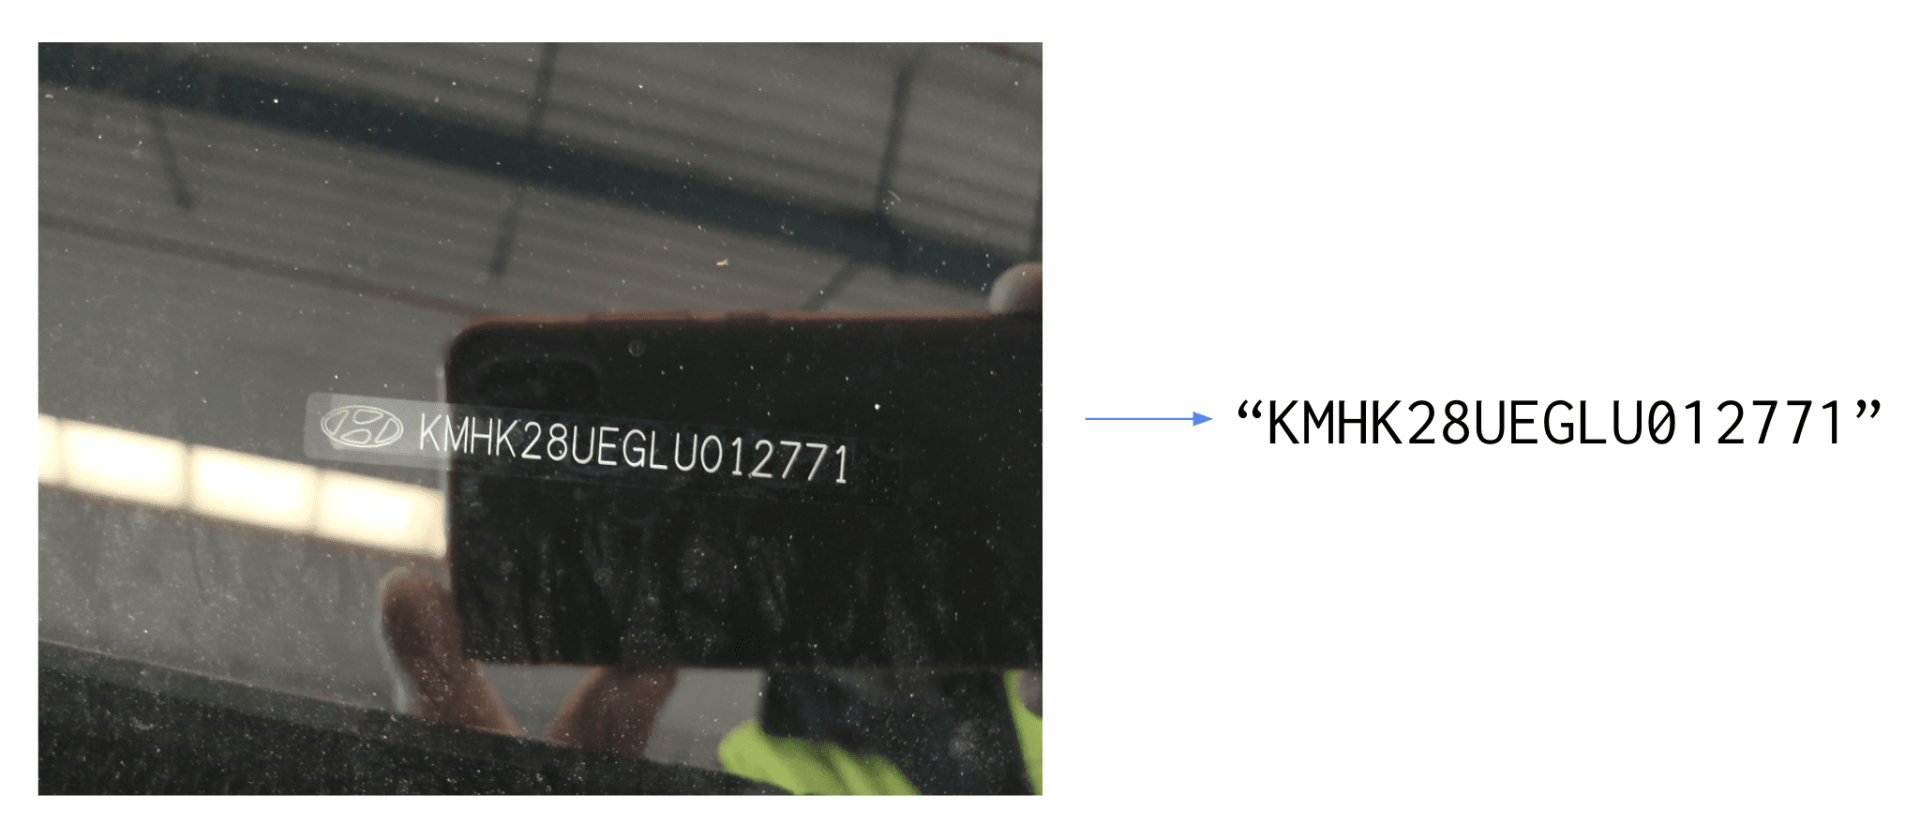
The VIN (Vehicle Identification Number) is a 17 character string composed of digits and capital letters that serves as the car’s fingerprint. It can help in identifying any car during its lifetime, and in getting specific information about it. This unique identifier is printed somewhere on the vehicle during manufacturing so that people can read it when they need it in some processes such as car rental or selling.
A few months ago, we were contacted by our friends from Monk: an AI company delivering state-of-the-art computer vision solutions for the automotive, insurance, and mobility markets. They are building a visual intelligence technology able to inspect any car in the world during every stage of the vehicle lifecycle.
Their sole focus is to build the best technology for detecting, classifying, and estimating damages on vehicles. Being able to read VINs automatically is important for them but not core business, that’s where Mindee gets in the game.
The VIN use case
Please note that any photo of VIN in this article was either voluntarily falsified or blurred.
The problem definition is simple:
- the input is a photo of a VIN written on a car
- the output is a 17 characters length string: the VIN
Performing this task automatically with high accuracy is harder than it looks. The main difficulties are:
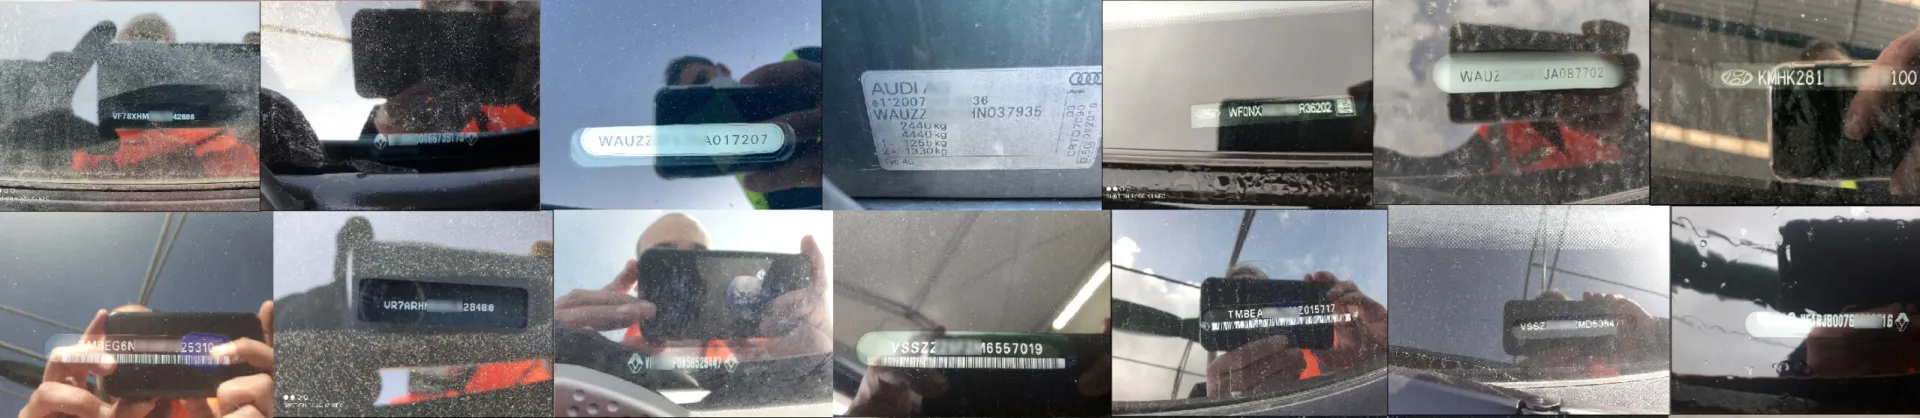
- The input photos are mostly taken outdoor, with a lot of noise (brightness, water stains, shadows…) that can make the detection and the recognition of the VIN difficult
- Although the VIN is written in a pretty standard format, the fonts used are not standard, not always the same, and the letter spacing can vary a lot.
- A checksum validation method exists to validate VINs, but it’s not working for all vehicles. We rejected this post-processing solution.
- Last but not least, the VIN is not always the only text written in the photos, using a traditional OCR approach is not enough as we’d need to add a layer of post-processing to filter out the unwanted characters.
A few examples of noisy images:

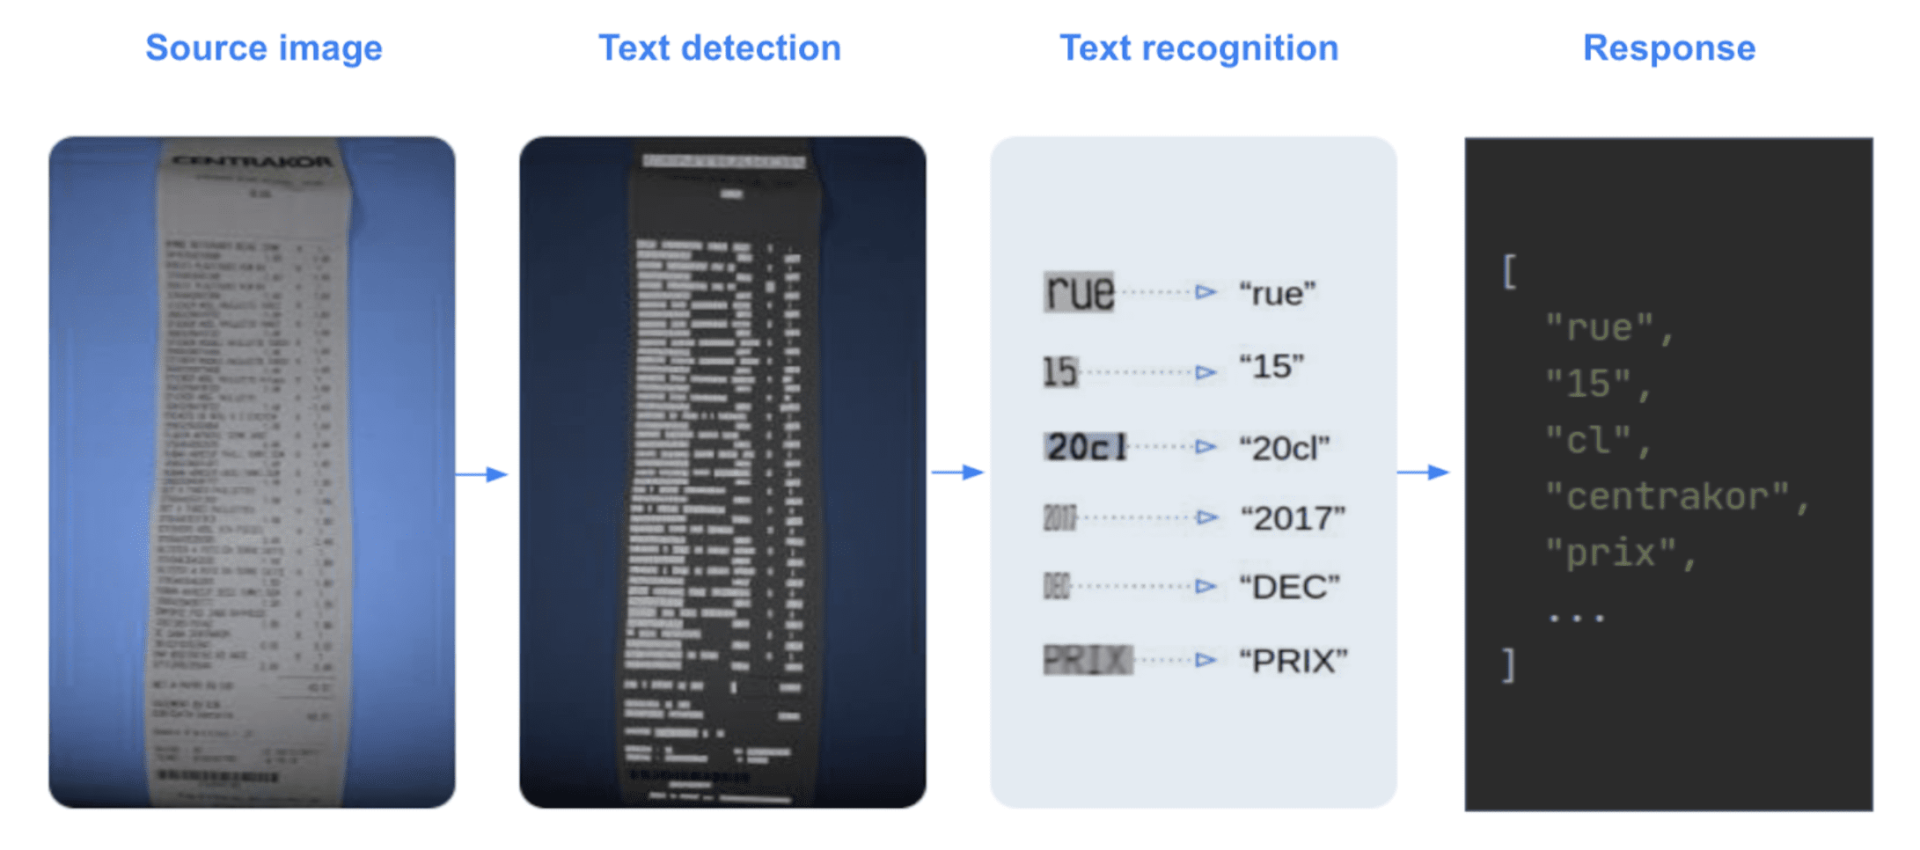
The first thing we did was to run off-the-shelf OCRs, both from open source libraries and cloud-based APIs. Because of the nature of the problem, the results were not good enough on the text detection and recognition. VINs are written on cars, not documents, and it’s not a common use case for character recognition technologies. We had to find another approach using Python and docTR.
Why use docTR?
DocTR is a Python Optical Character Recognition library for data scientists and developers. The end-to-end OCR is achieved using a two-stage approach: text detection (localizing words), then text recognition (identifying all characters in the word).
DocTR includes pre-trained models for both the detection and the recognition tasks. Anyone can use it for extracting words from an image or a pdf. You can test it out very easily (more information in docTR documentation)
1. Installation
2. Python hello world
But as we mentioned earlier, no OCR was working well on our VIN problem. General-purpose OCRs are not a good solution for this use case because:
- OCRs are meant to be generic, and the problems of text detection and text recognition are very hard when it comes to “In the wild” data such as photos of VINs.
- Generic OCRs’ output list the characters written in the image, and even if all of them are accurately detected, how do you reconstruct the VIN string out of it?
To get rid of those constraints, we decided to fine-tune docTR models on VIN data for both the detection and recognition tasks to get better performances. This way, the detection will only extract the VIN characters (not surrounding characters), and we’ll have a fine-tuned model for reading them. The library includes those training capabilities for the detection and recognition stages based on pre-trained models. Fine-tuning our models on VIN data can be achieved very easily thanks to those pre-trained models: we should get high accuracy as they were pre-trained on millions of various data.
Our contributors are frequently adding state-of-the-art models to the library. Here is the list of available models as of today:
Text Detection
- Real-time Scene Text Detection with Differentiable Binarization.
- LinkNet: Exploiting Encoder Representations for Efficient Semantic Segmentation
Text Recognition
- An End-to-End Trainable Neural Network for Image-based Sequence Recognition and Its Application to Scene Text Recognition.
- Show, Attend and Read: A Simple and Strong Baseline for Irregular Text Recognition.
- MASTER: Multi-Aspect Non-local Network for Scene Text Recognition.
This is how we nailed the VIN extraction case with Nicolas Schuhl.
Our dataset
We have 5,000 photos of VINs taken with different devices, all of them being from different vehicles. That’s a good start! Nicolas told us that they have a template of layout in their mobile application for the photo capture, enforcing the user to take a picture with the right orientation. That makes the problem easier because we can assume the input images are in the right orientation. It also helps us make sure that VINs are not too skewed: we can consider a maximum absolute skew angle of about 5°.
Our dataset contains photos with wrong orientations and skewed VINs with angles above 5°. We removed skewed photos above 5° plus a small delta (not 5° to keep some hard cases in the training set), from our dataset and changed the orientation to get every photo straight.
We took 75% of the data for the training, 15% for the validation, and 10% for the test set that we carefully put aside.
Annotating the text detection dataset
DocTR text detection models output a segmentation heat map of the image, as well as the list of interpolated polygons in relative coordinates.
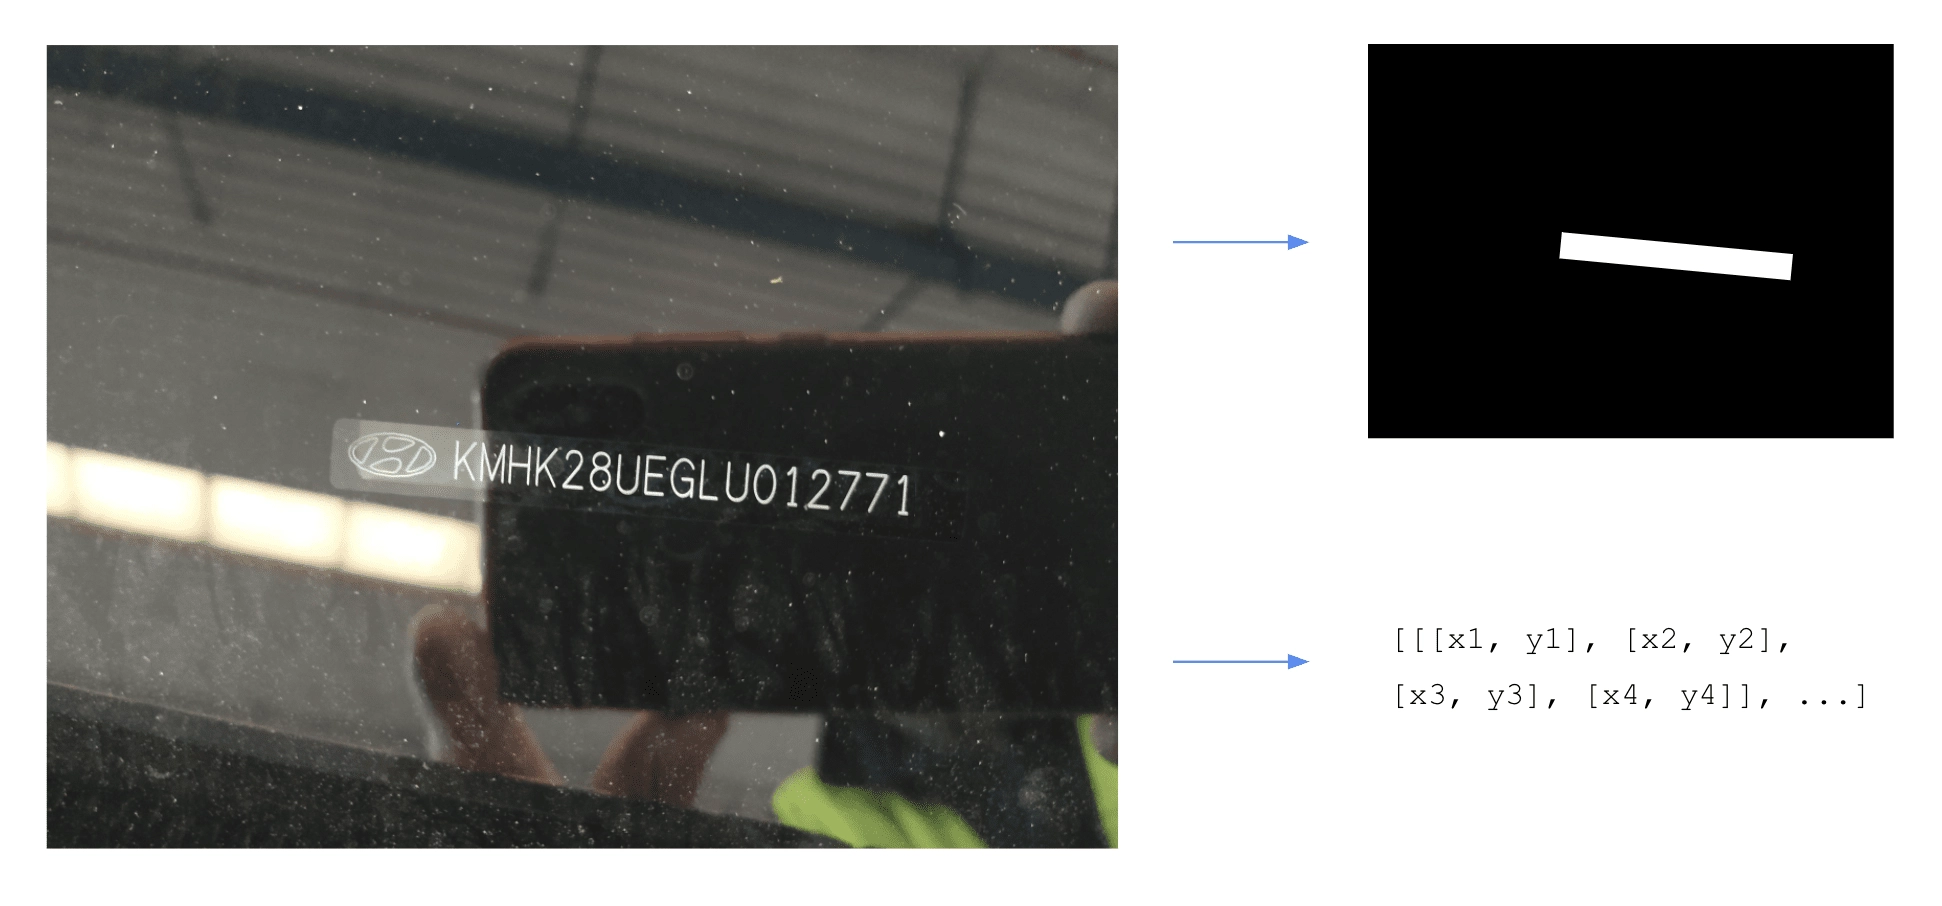
In order to train this model, we need to provide for each image the set of polygons corresponding to the position of the text we are looking for. You can find more information on docTR references.
In our case, the label for each image is a single polygon, representing the position of the VIN in the image.
The training and validation sets have to be structured in folders this way:
The labels.json file map the input filename to their polygons labels:
We used our internal tool for annotating this data, but you can find many great commercials (such as V7 or Kili) or open-source (a great benchmark here) software for doing this.
Annotating the text recognition dataset
Within the docTR end-to-end pipeline, the text recognition model takes as input crops of the input image that were detected in the first text detection stage. This algorithm will then perform the “reading” task on those crops in order to get a machine-encoded string.

Annotating the recognition dataset is a bit more tedious than the detection. We used again our internal tool that includes a pre-annotation feature using a general-purpose text recognition algorithm to make it easier. It’s indeed easier to correct a few characters than type all of them manually from scratch. You can find this feature on many commercial annotation software.
For the text recognition task, docTR requires the datasets folders to be structured the same way as the text detection and the labels.json file should map every input filename with a unique associated string:
The labels.json file map the input filename to their output string:
Training the models
Now let’s jump to the fun stuff! As you may imagine, the real process was actually many back and forth between training experiments and data cleaning to improve the performances. But for the sake of this article, let’s consider that the dataset was perfectly annotated the first time.
We are going to train our models using the TensorFlow 2 (TF) backend: this can also be achieved using the PyTorch backend as the steps are very similar. You can install docTR using either TF or PyTorch backend this way:
Tensorflow
PyTorch
Make sure you have the 4 required folders of annotated data such as:
Text recognition model training
Let’s start with the text recognition algorithm.
1. Install docTR
2. Clone the repository somewhere on your laptop
3. Navigate to the docTR repo you just cloned, and get into the recognition references folder. The references/recognition folder contains a training script for both TensorFlow and PyTorch.
4. Launch the training using the sar_resnet31 (This model using a Resnet 31 backbone)
—pretrained: Will train the model starting from docTR – SAR with Resnet31 backbone trained model’s checkpoints.
—wb: Will launch an experiment on Weight & Biases. You could also use
—tb: if you want to use TensorBoard instead.
Depending on your machine specs, if you don’t have enough memory, you might get an Out Of Memory (OOM) error. If this error occurs, decrease the batch size using the -b parameter:
-b: Batch size
The validation step happens after each epoch, and the checkpoints will be saved in the references folder if the validation loss is the lowest of all epochs.
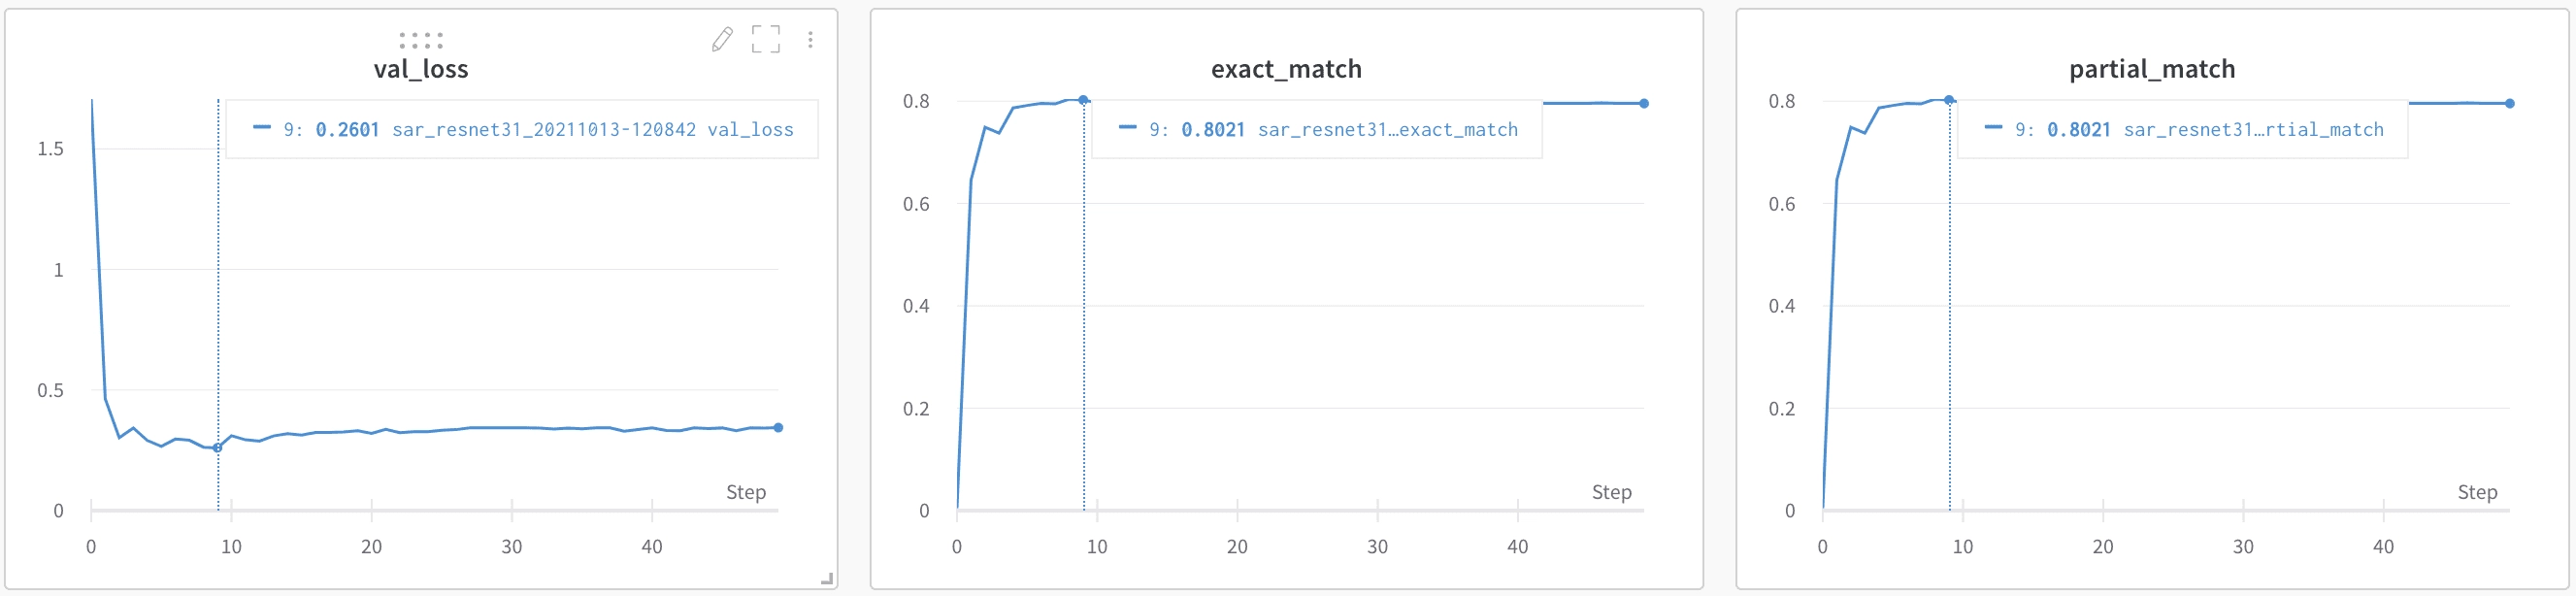
The model converges very fast and was able to achieve an 80% of exact match on the validation set. It may not seem that much, but it’s because we decided to put skewed data in the training set. We’ll soon compute the end-to-end metrics as it’s the most important one and see how it goes.
Text detection model training
For the text detection model, here are the steps:
- Navigate to the /references/detection folder
2. Launch the training using the db_resnet50 (This model using a Resnet 50 backbone)
The detection model is heavier than the recognition model: it’s more likely that you get the OOM error on this one. Again, think about decreasing the batch size if that happens.
Using a pretrained model for this task is very important. The docTR model was trained on detecting any word in images, and we are looking for VINs only. By retraining this model only on VINs, we’re fine-tuning the model to detect only VINs and filtering out any surrounding text.
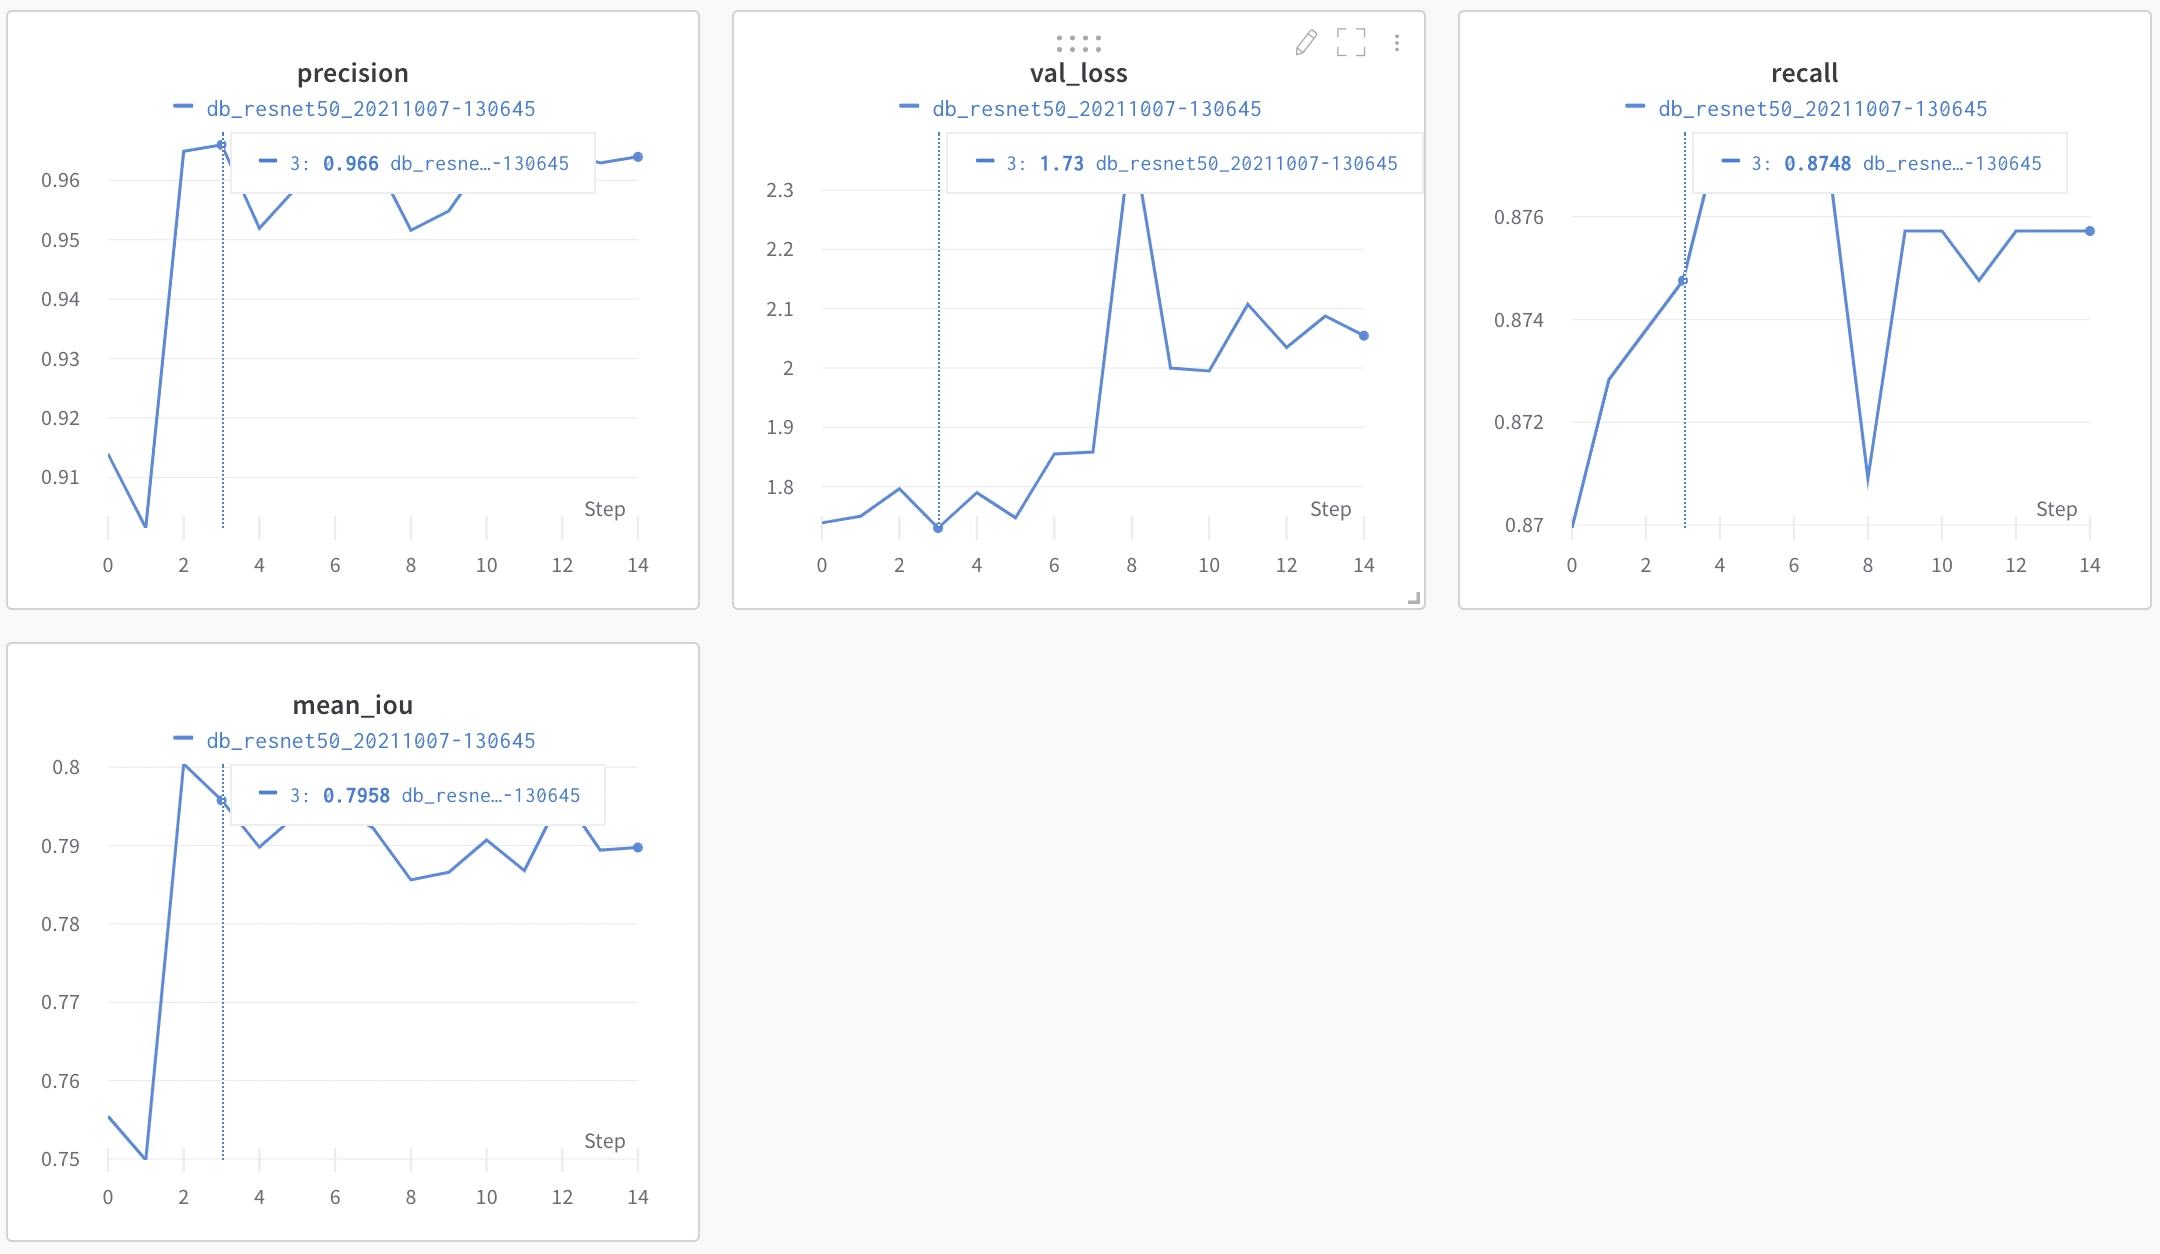
The detection metrics are a bit harder to analyze than the recognition ones. The precision looks very high though, but as the IoU is not actionable easily, we’ll figure out how well the models are performing by testing the end-to-end pipeline.
Testing the trained models
Our models were saved in the reference folder on the cloned docTR repository.
To see the models work in action, the code is quite simple:
There is no reason the text detection algorithm fits perfectly the size of boxes that optimizes the text recognition algorithm. To find the best parameter, we fine-tuned the unclip_ratio parameter against the validation set. This is the factor to be used to expand the output polygons from the detection model in order to generate a squared box that can be fed into the text recognition model. As the two models were trained separately, there is no reason the default parameter is the best one for optimizing the text recognition performances.
After testing the trained models on our test set, we achieved a 90% of end-to-end exact match, which is great given the low number of data and the complexity of the use case. If we wanted, we could have spent more time optimizing the model with a few ideas:
- The detection models were trained on squared boxes. DocTR will soon support rotated boxes, this should give us better robustness for skewed photos.
- Hyperparameters fine-tuning: We didn’t spend a lot of time on that. We noticed for example that the learning decay has a strong impact on the training. We tested out a few values manually but we could have spent more time and run a grid search for these parameters. The input sizes can also be important and we used the default docTR parameters.
- Text recognition pre-trained model only for the backbone part of the algorithm: while it’s very nice to have pretrained models, we are not free to use the vocabulary we want when using them. We asked the docTR team if it was possible to get pretrained models only for the backbone part of text recognition algorithms, so we can train the classification heads with our specific vocabularies. An issue was opened and they will work on this soon.
- Of course, more data…
Conclusion
This case is a good example of an end-to-end text extraction problem that requires retraining of both the detection and the recognition layers to get better performance. Using a generic OCR and trying to extract the key information you want can be very tedious. You’d need to build a lot of post-processing on top of your raw OCR results and it’s unlikely that it will perform well on the simple tasks of text detection and recognition.
Feel free to join Mindee’s slack community if you have a similar use case, or try out docTR and give us your feedback 🙂


