.svg)


Table of Contents
In this article, we’ll show you how to transform images, scanned PDFs, and similar files into OCR PDF documents—making them fully searchable.
Below is the two-step process we use at Mindee to convert your files into high-quality, OCR-enabled PDF :
- First, we use an open-source tool called Mindee docTR to perform OCR (Optical Character Recognition) on the image or scanned PDF. The docTR OCR results are then exported as an XML file in hOCR format.
- Lastly, we convert the hOCR file to PDF using an open-source tool, OCRmyPDF
Why Create an OCR-Enabled PDF?
We make images as well as the scanned documents or PDFs into OCR-enabled PDFs so that we may search for certain keywords or phrases within them. A few lines of code is all that’s needed to do this. With the approach we present, we’re also able to exhaustively OCR-process the texts embedded within the images, which are normally left out (logos, watermarks, etc.).
To better understand why we need to digitized documents, let’s take a look at two use cases, which involve searching through a huge PDF and searching through a folder full of PDFs.
Below is a non-exhaustive list of documents that can be categorized under the two use-cases.
Searching Within a Large PDF
Examples include:
- Contracts (terms and conditions, loan contracts, employment contracts, etc.)
- Specifications
- Scientific and technical reports
- Insurance policies
- Request for information/quotation/proposals
Searching Through a Folder of PDFs
Examples include:
- Resumes (to find specific skills)
- Questionnaires/forms (to locate particular answers)
- Invoices, receipts, and quotations (to identify a specific item, customer, or supplier)
- Presentations (to search for any keyword)
- Old scanned news articles (to retrieve specific news content)
Creating an OCR-readable PDF streamlines the process for both non-developers and developers, enabling quick keyword searches using any favorite PDF reader.
You can also check out our article on how to read the passport MRZ lines!
Why Use docTR for Creating OCR PDFs?
A Quick Overview of docTR
docTR is one of the best open-source OCR solutions available on the market. It uses state-of-the-art detection and recognition models to seamlessly process documents for Natural Language Understanding tasks. With just 3 lines of code, we can load a document and extract text with a predictor!
pip install python-doctr

from doctr.io import DocumentFile
from doctr.models import ocr_predictor
======================================

model = ocr_predictor(pretrained=True)
# PDF
doc = DocumentFile.from_pdf("path/to/your/doc.pdf")
# Analyze
result = model(doc)
docTR supports pretrained backbones such as dbresnet50rotation for both text detection and recognition. For more details on available backbones, please refer to the documentation. Additionally, docTR’s ability to train with small rotations makes it exceptionally robust for creating accurate ocr pdf files. A list of supported vocabularies is available here.
Performance Comparison
Using various datasets, the table below compares docTR with alternative OCR solutions:
Comparisons with public datasets such as FUNSD and CORD also demonstrate docTR’s competitive performance:
The above OCR models have been evaluated using both the training and evaluation sets of FUNSD and CORD. For further information regarding the metrics being used, see Task evaluation.
Jumping Into the Code!
To create lightweight OCR PDFs using docTR and OCRmyPDF, start by installing the necessary tools: Mindee docTR and OCRmyPDF.
# installing requirements
!pip install "python-doctr[tf]"
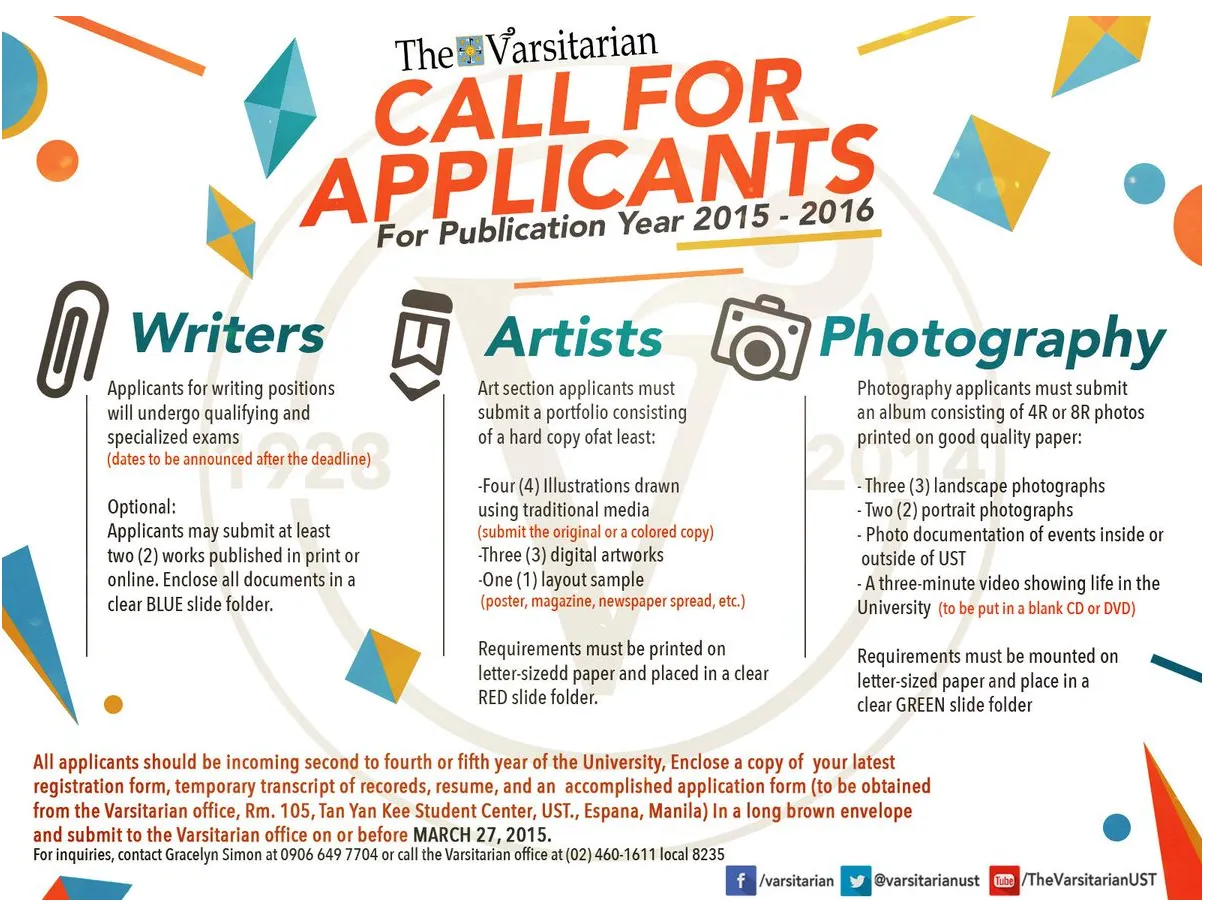
!pip install ocrmypdfYou can use this example or any image/scanned PDF of your choice. For this tutorial, we’ll use the sample image below:
Downloading the Sample Image
To download our sample image, you can run the following code:
# sample input image
!wget https://pbs.twimg.com/media/B_UpX3WU8AA2j3r.jpg -O ./data/images/image.jpg
Alternatively, save the image locally on your computer.
As iterated earlier, we are breaking the process into two steps:
Step 1: Extract Text Using docTR
Define the output folders for the OCR PDF and the hOCR data:
import os
# define output folder
output_folder = "./output/"
output_hocr_folder = output_folder + "hocr/"
output_pdf_folder = output_folder + "pdf/"

os.makedirs(output_hocr_folder,exist_ok=True)
os.makedirs(output_pdf_folder,exist_ok=True)
Then load the image (or scanned PDF) and perform OCR:
from doctr.models import ocr_predictor
from doctr.io import DocumentFile
# load image
image_path = "./data/images/image.jpg"
# extracting text from input image using docTR
docs = DocumentFile.from_images(image_path)
# load model
model = ocr_predictor(
det_arch='db_resnet50',
reco_arch='crnn_vgg16_bn',
pretrained=True
)
result = model(docs)
# display ocr boxes
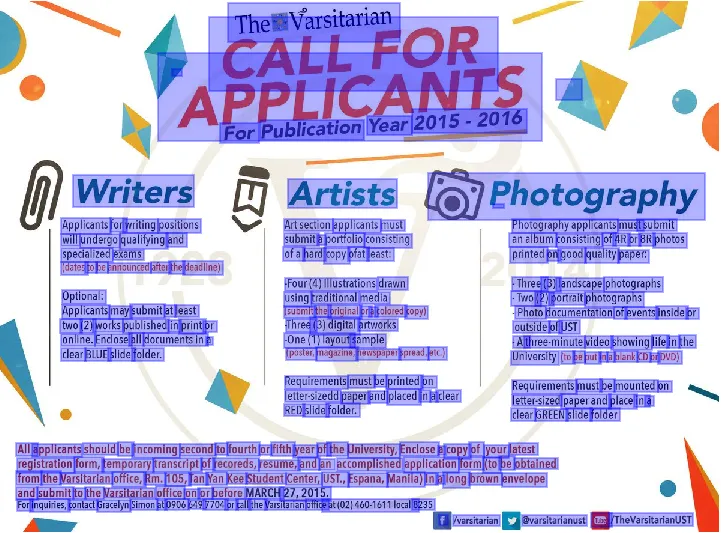
result.show(docs)Below we can see the docTR result which shows the detected and highlighted text in the image:
Step 2: Export hOCR and Generate the OCR PDF
Export the docTR OCR results as an XML file in hOCR format:
# export xml file
xml_outputs = result.export_as_xml()
with open(os.path.join(output_hocr_folder,"doctr_image_hocr.xml"),"w") as f :
    f.write(xml_outputs[0][0].decode())
After exporting the hOCR result of docTR as XML, we can use OCRmyPDF to convert it to an OCR-readable PDF:
from ocrmypdf.hocrtransform import HocrTransform
output_pdf_path = output_pdf_folder + "hocr_output.pdf"

hocr = HocrTransform(
    hocr_filename=output_pdf_path,
    dpi=300
)

# step to obtain ocirized pdf
hocr.to_pdf(
    out_filename=output_pdf_path,
    image_filename=image_path,
    show_bounding_boxes=False,
    interword_spaces=False,
)
And voilà! You’ve created your OCR PDF file.
Searching Through Multiple OCR PDFs
In the Ubuntu terminal, for example, you may use the Ubuntu pdfgrep command to search a folder full of numeric or digitized PDFs.
To do this, let’s first install pdfgrep:
# first let's install pdfgrep
sudo apt-get update
sudo apt-get install pdfgrep
Now we can use pdfgrep to search for any information using a keyword. We can do simple searches with an exact match or use a regex for more flexibility. Let’s look at some examples:
Below, we want to look for year-specific information using the keyword “Year.”
pdfgrep -r "Year"

./hocr_output.pdf: APPLICANTS   ForPublication Year2015-2016
We can also search for a specific time-lapse, say from 2010 to 2019, using a simple regex.
pdfgrep -r -P "\b201[0-9]\b"

./hocr_output.pdf: APPLICANTS   ForPublication Year2015-2016
./hocr_output.pdf:andsubmittotheVarsitarianofficeonorbeforeMARCH:27,2015.
From the above examples, you can see how easy it is to leverage OCR-readable PDF search power on a folder – using only a few lines of command.
Why Use OCRmyPDF?
OCRmyPDF is a tool that adds text layers to scanned image PDFs, making them searchable. It also optimizes PDFs by compressing them without loss of quality—optimizations are applied only after successful OCR processing. With options for rotation correction, batch processing, and selective OCR, it’s a versatile solution for generating high-quality OCR-processed PDF files.
However, OCRmyPDF’s default reliance on the Tesseract OCR engine can sometimes limit accuracy, especially on poor-quality scans. This is why we use docTR as an alternative OCR engine to produce superior OCR PDF esults.
This article helps overcome the major limitation of OCRmyPDF, which is limited by the Tesseract OCR engine. As a result, Tesseract is not as accurate as a state-of-the-art OCR solution (you can test OCR accuracy with our benchmark tool). Poor quality scans could produce poor quality OCR. That is the reason we went with docTR as a replacement for the default OCR engine of OCRmyPDF.
About
.svg)